Getting Started
Setting Up Templates
Templates are PHP files on the web server used to control the display of content on your site. They are similar to conventional html documents, except they incorporate special MonkCMS API code used to bring in content dynamically.
MonkCMS offers a great degree of flexibility when it comes to building templates and arranging the file structure on your web server. Like all sites that adhere to web standards, your site should use the following:
- (X)HTML for site structure and content
- CSS for presentation
- Javascript for behavior
If you have worked with PHP before and/or are familiar with the concept of includes, you may take advantage of this to reuse code for headers, footers, etc.
Web Server File Structure
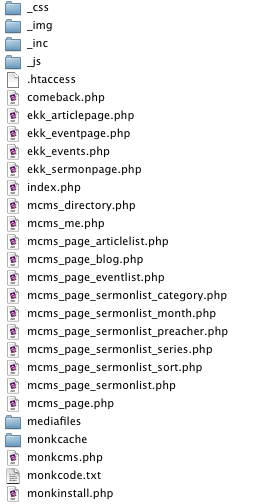
There are some required files and naming conventions necessary for the system to function. Most of the required files will be automatically created when your site has been configured to use MonkCMS for the first time. Figure 1 displays a typical file structure for a MonkCMS site.
Figure 1

The following templates are required by the system, though their contents can be freely tailored to your needs:
- index.php
- ekk_articlepage.php
- ekk_eventpage.php
- ekk_sermonpage.php (if sermon module is enabled)
MonkCMS naturally reserves index.php as the home page, and the other templates are “hardwired” to display content for their respective modules (Articles, Events, etc.)
Recommended Conventions
Though you have a great degree of freedom when it comes to the naming of templates, css, javascript and include files, we recommend using a similar file structure to the one shown in Figure 1. Using an underscore prefix for css, image, include and javascript files keeps the folders in easy-to-find location. Preceding custom templates with “mcms_” and giving them a meaningful name serves the same purpose. If you are collaborating with others or need to enlist help from Monk, following these conventions allows for a more efficient way to locate code.
MonkCMS Starter Set
If you develop a lot of sites, you’ll find that it’s helpful to have a common starting point from which to build your templates. We have created a Starter Set of files that follows the above conventions and allows you to begin working on the html and css of your site very quickly.
Note: since these files require PHP, you will need to run the site through an actual web server for pages to display correctly. Opening files directly in the browser will not work.
MonkCMS Starter Set (39KB, zip)
Recommended Workflow
- Set up a testing server, either on your own machine or a remote host. The server should be able to run PHP, and Apache is highly recommended. There are a variety of resources online that can help you set up a testing server, depending on your operating system.
- Move the MonkCMS Starter Set of files to the root of your testing server. You can use a subfolder of your testing domain, but note that this will affect your file path structure for images, css, etc. If you cannot work from your testing site’s root folder, consider using a subdomain (remote host) or named domain (local machine).
- Working from your site designs, build your templates out using HTML, CSS and any test content you need. The test content will eventually be replaced by the dynamic content generated by the API calls, but it helps to incorporate this in for styling purposes. We usually start with the home page, move onto the default/sub page, then the other templates used for the various Modules available in MonkCMS.
- Once your static testing site looks and behaves as you would like, you can move the templates over to the staging site that is connected to MonkCMS and can begin incorporating the API.
- We've included a number of API snippets in the Starter Set that will produce dynamic content. These snippets can be found in the getContent folder of the Starter Set. Once your site is on the MonkCMS staging server, replace the static content in your template files with the appropriate snippets from the Starter Set.
- You can learn more about fully utilizing the API on the following pages.
